

How To Draw Anime Side View Male
In this article, TipsMake.com volition bear witness you lot how to draw the heads and faces of anime and manga characters from the front end and side views.
The goal of this tutorial is to help y'all draw the face of a youthful grapheme. Male characters in manga and anime at this age tend to take large chin, long faces, with smaller, narrower optics when compared to female characters or younger male person characters. However this note may also vary depending on the writer's chosen way.
If you paint with pencil and paper, create very light lines for the original stroke because you lot will demand to remove some excess later finishing.
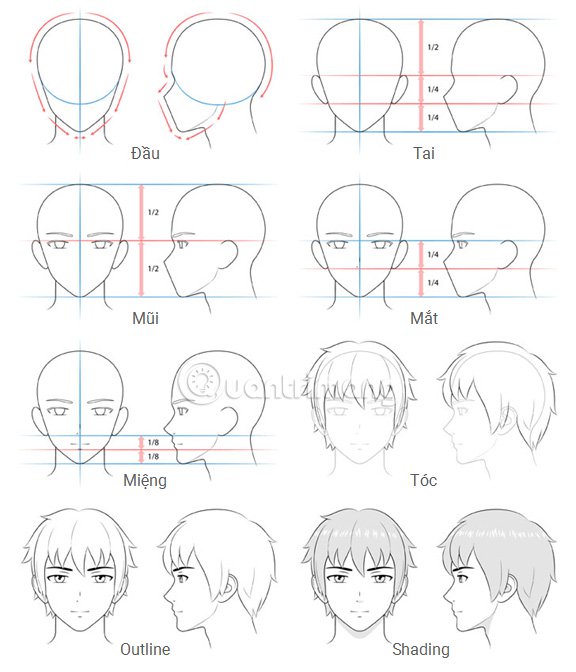
Step 1: Draw the character's caput
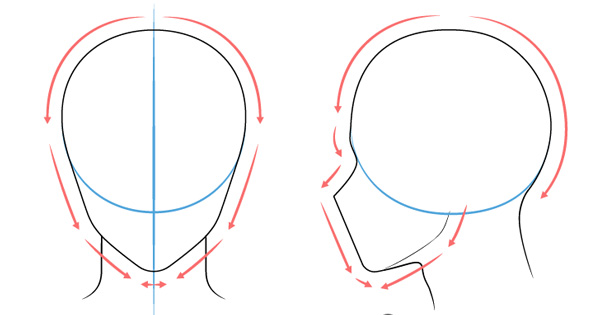
Front view
Draw a vertical line equally the chief axis betwixt the faces to align both sides. Bring the focus into a circle or slightly oriented into an oval, from which to describe two straight lines facing the within of the face, gradually curving to form a mentum.
Depict the chin with a pocket-sized curve just don't be as well sharp or the character will look less masculine.
View from the side
Describe the elevation of the oval.
Put the pen into a bump around the eyebrow area, then a dent to turn to the nose. Important in this step is that you determine the position of the nose so that information technology is relatively standard, can be further edited in step iv.
Next, draw a directly line from the tip of the nose to the chin. Add a bend from the chin to the top of the ear to grade the lower jaw, describe a curve underneath the line and draw a chip, still starting from the chin point to clearly outline the larger mentum of the grapheme. male.
Pace 2: Draw the grapheme'south ears

To draw the ears of male anime and manga characters, commencement divide the caput into iv equal parts like the moving picture, draw the ear on the third part from the top, shut to the chin.
With the view from the side, the ear will lie back to the back of the head.

Add small details to the character's ears, because dissimilar women, the ears of female characters are often covered by hair so they don't need to exist likewise fussy in this part.
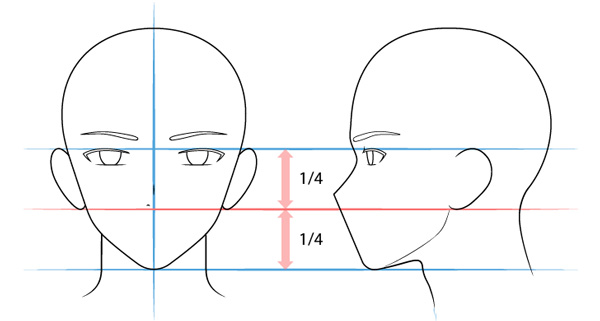
Footstep three: Draw the character's eye

The younger the character, the bigger the optics. In this case, the graphic symbol is a immature man then his eyes will exist smaller than a boy's.
Based on the horizontal baseline, split the get-go part drawn in a higher place and draw the center nether this line, the altitude between the eyes depends on your estimation, depending on the way and character type.
Note, the eye is in this position when the character is in a normal country, if the opening is larger (unexpected country), the eye will override the base line, if the eye is in a closed state (going to sleep) then it will lie under.
Draw eyebrows above the eyes. The eyebrows of male anime characters and manga are oftentimes drawn thicker than that of females, especially with older characters. However it also depends on style.
In this step, you lot just need to outline the center shape, giving simple strokes. Go through every detail, so follow the steps below.
Step iv: Draw the character nose
Draw the olfactory organ with a small straight line on the vertical baseline dividing the face. The nose tip actually doesn't need to be painted, it's hard to locate the nose. In addition to the small line just drawn, add a small line representing the nostrils, located near the centre of the lower half of the face, slightly college than the horizontal baseline.
With the side view, you describe with the character'southward rima oris in the next step because the strokes will be more seamless.
Footstep five: Depict the mouth of the character

Finally, locate the lower lip of the rima oris with a line between the tip of the nose and chin, and then draw the upper lip a bit higher up.
The lower lip will be a short stroke, the upper lip is longer, is a gentle bend, breaking a small fold in the heart. Notation that the male character volition have a wider mouth than the female person grapheme
Step 6: Draw grapheme pilus
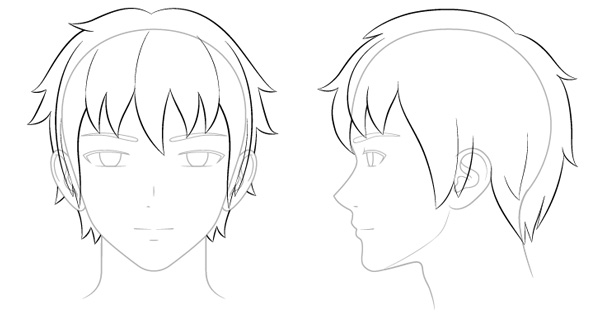
Now you lot add hair to the character. Hair volition overlap some other features that take drawn on the face. Delete the parts covered by hair after you finish.
To get anime-style hair, depict into clusters with big pointed tails.
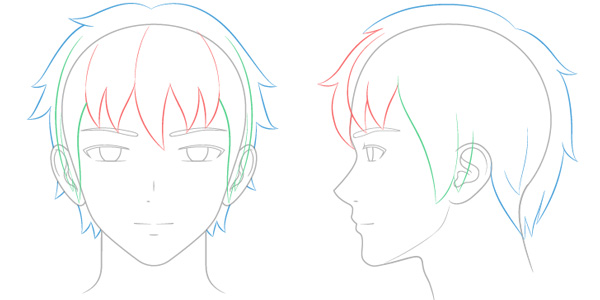
To assist you better understand how to describe hair, separate the hair into three different sections (front, side and back / acme).
- Red : front hair department
- Green : the side hair
- Blueish : the hair behind and at the top of the head
Dividing in this fashion is useful when you want to draw pulled or blown hair in different directions.
Step 7: Add smaller details on the face
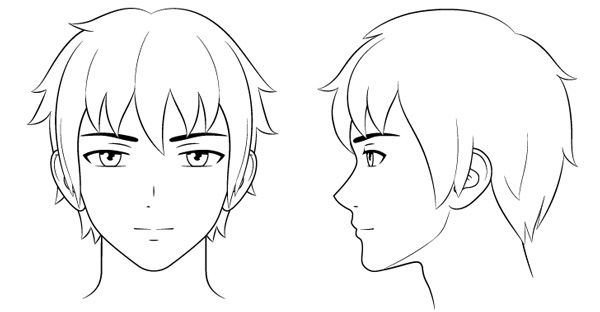
At this step yous tin can clean upward the drawing and remove the guidance frame lines created in the previous steps, adding smaller details such as eyelashes, pupils and highlights. Later on that, you can likewise focus on thicker lines, add black or shaded with a pencil (depending on what you want) on the eyes and eyebrows. You can also create lashes for eyelashes and add some details to the hair.
Afterwards completing these steps, you have a complete drawing of the face of the male anime character. You lot can leave it as it is, but if you want the image to be a bit deeper, motion on to the next step to shade the face.
Pace 8: Fill the shadow with the graphic symbol
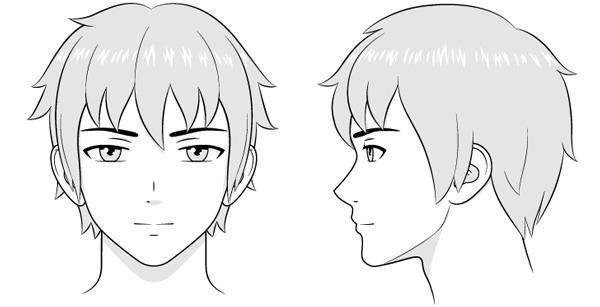
Yous can add some very bones nuances to the drawing to make the work more prominent, shaded for some areas needed, for example:
Shadow poured from pilus to forehead and sides of face
- Shadow poured from eyelids to iris
- The ball poured into the inner part of the ear
- Shadow at the lesser of the nose
- Shadow poured from face down to cervix
- .
Conclude
The caput and face of the male anime character tin vary depending on the style but in general the older the grapheme is much more different than the female grapheme. Younger characters often have female-like faces, and older characters are often fatigued with longer faces, smaller eyes and more clearly divers facial features.
Accept a practice pen to take beautiful works! Good luck
Source: https://tipsmake.com/guide-to-drawing-male-heads-and-face-characters
Posted by: myersborceir.blogspot.com
0 Response to "How To Draw Anime Side View Male"
Post a Comment